

6 tips on how to take that perfect portrait
- NYP CEAC

- Aug 21, 2018
- 5 min read
Updated: Jan 25, 2019
Have you ever dreamt of being a world renowned photographer, capable of taking exceptional photographs? Or are you just a beginner in the world of photography? ; In that case, fret not. Take baby steps, grab your camera, and follow some of these simple tips to capture moments like how a professional photographer would. As the saying goes;
"Those at the top of the mountain did not fall there".
So, remember, practice makes perfect. Follow up on our next article for more photography tips.
Tip 1: Eye contact 👁👁
Eye contact has the ability to make an immense difference to the impression given by the image taken. There are 3 types of eye contacts. Direct, between subjects and lastly, no eye contact.
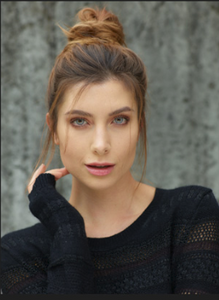
1) Direct eye contact
This makes photographs more captivating as there is a personal connection as though the subject is directly looking at the viewer. Try to holding on to the camera at the subject's eye level to unleash the power of your subject's magnetic gaze. Photographing at eye level, creates a connection. This personal touch, defines the relationship through the expressions given, which may include; happiness, anger, sadness etc.
2) Eye contact between subjects
This type of eye contact depicts the relation between the two subjects. This way, the viewer becomes an observer (third party) as they are not "personally involved". This visual connection is not only limited between 2 people. It could also be a photograph of a child playing with his pet, a florist arranging flowers etc.
3) No eye contact
Lastly, no eye contact gives a feel as though it was a candid shot and that the subject was not aware that their picture was being taken. This method introduces an element of the "unknown". A quote from a photography magazine (Photography focus guide) mentioned:
"Without eye contact, the whole mood of the image changes- the camera is now simply an 'observer' and this is a great opportunity to show a subject in a different way"
Here are examples of various eye contacts mentioned above (in order):


Tip 2: Using a plain background
When the main objective of the image is to make the subject stand out, it is crucial to study their surroundings. Here are some ways of ensuring that they are the center of attraction in the image. Firstly, when taking pictures, try to avoid a background that has too many objects or patterns as this could distract your audience’s attention. After taking the photograph, check the viewfinder to study the subject's background to double check.


Example of an image taken against a patterned wall and a plain wall.
The subject's features (on the right) are more pronounced as compared to the the subject against a patterned wall (on the left).
Tip 3: Master the Light🌞
One of the most important component of taking a picture is the lighting. For starters, there are 2 types of lighting, Natural and artificial lighting. One example of natural lighting would be, using sunlight.
Sunlight can be challenging to work with, especially for beginners. In certain situations, it may not be the most suitable option to accentuate the subject's features as it can be quite harsh. For instance, sunlight from the side profile of the subject might not be the most flattering as it may enhance features that are not to be highlighted, such as wrinkles and dark circles.
Furthermore, when the sun is directly overhead, unflattering shadows may form under the subject’s eyes. The solution is simple: move into the shade. The more costly solution is to use accessories like reflectors or filters in this situation.


On the other hand, sunlight can be used to take flattering and artsy images especially during the time of the day called "Golden hour". It is the first hour after sunrise and last hour before sunset. There can be 2 variations of images that can be taken during golden hour. One, using the warm and soft light in the background of portrait images (top). Another option is to take the picture with the sun directly on the subject (bottom).


Alternatively, look for a window or turn on the light when shooting indoors. Window lighting is the easiest to shoot with. However, this is only a useful in the day. At night, turn on all the lights in the room before shooting. With artificial lighting, the photographs will be bright and clear.
Tip 4: Play around with height As a photographer, camera angles can make or break the end result. The positioning and height of the camera in relation to the subject can have a drastic effect on how the image turns out. One simple way of adjusting the angle and height would be to kneel down (low angle) or stand on a chair (high angle). Low and high angles work for different subjects in various situations, which takes time to master.
Low angle:
This angle works well when photographing pets/animals. By bending or kneeling down, the photographer will be able to shoot at eye level to enhance the pet's features. This way, the audience would feel as though the pets are actually looking into their eyes, which creates a personal touch.

High angle:
This angle is typically used for group shots, especially when it is not possible to fit every subject into the frame. High angles are also used for standard portrait photography as well. Some photographers use this angle to create a sense of surveillance as though they are being watched from a 3rd person.
High VS Low angles


These 2 images are examples of how angles can affect the personal connection between the viewer and the subjects in the photograph. For the image on the left, the photographer was standing up to create an feeling that they were just an observer looking at the group of friends. On the other hand, the image on the right was taken very low to the ground. This creates an illusion as though the photographer was part of the scene. Hence, it shows how the different angles and heights create different emotional response as a viewer.
Tip 5: EDIT YOUR PHOTOS
An image is not complete after pressing the shutter. Various photo editing software can further enhance and beautify photographs to a higher level. It helps to better convey the message and evoke the audience’s emotions. Editing software enables photographers to enhance the contrast, brightness, tint etc. These might not be easily manipulated in real life when they are taking the photograph. Hence, these tools will be able to help.
There are plenty free software applications that available online now. You can simply use any one of it and start giving a great final touch to your photo. Refer to our next blogpost "Photo editing apps" for some of the best applications to easily edit photographs


Original photo vs edited photo using software
Tip 6: Rule of thirds
Rule of thirds is a term used to display the subject's position in the image. It separates the image into thirds, subsequently displaying 9 parts. This serves as a guideline for the photographer to position the subject in the best spot.

The center of the photograph may not be the best position for your subject, even though it may seem like the safest option. However , there are certain situations where shifting the subject away from the middle would enhance the picture tremendously. Studies have shown that people's attention while viewing images tend to go to one of intersection point naturally rather than the center of the shot.
-


References:
1. How to take better pictures when you know nothing about photography
2. How To Photograph Your Life. Don’t Put Your Subject In The Middle Of The Frame http://www.howtophotographyourlife.com/dont-put-your-subject-in-the-middle-of-the-frame/
3. "Top 10 Tips for Great Pictures – Kodak Moments." Kodak Moments. Web. http://apps.kodakmoments.com/top-10-tips-for-great-pictures/.
4. Tips for Using the Rule of Thirds in Photography
https://photography.media/tips-for-using-the-rule-of-thirds-in-photography
Photograph from:
http://www.shariblog.com/2016/11/what-is-rule-of-thirds/
5. Golden hour image
https://www.youtube.com/watch?v=Bxqms8MVTQ0
6. Quick Tip: 3 Types of Eye Contact in Photography
https://photography.tutsplus.com/articles/quick-tip-3-types-of-eye-contact-in-photography--photo-1692
7. How to Choose Your Camera Angle To Take Better Portraits
https://digital-photography-school.com/camera-angle-portraits/


Comments